Valley of Slaughter Guide
Welcome to your ultimate guide for navigating the Valley of Slaughter!
This in-depth walkthrough is designed to assist you in overcoming the tier 2 dungeon in Throne and Liberty.
Although this dungeon has some resemblances to Butcher’s Canyon (tier 1), it presents a much tougher challenge, demanding players to be well-equipped.
To ensure a successful run, make sure your gear is at least +9 epic grade or better.
At the start of your journey through the dungeon, you will face three enemies stationed near an elevator. Among them is the Administrator, who possesses the crucial key to activate the elevator. Focus on eliminating these foes swiftly to continue your ascent.
To optimize your clearing speed, after you cross the initial bridge, have your tank draw the attention of the mobs on the bridge. Meanwhile, the rest of your team should move ahead to tackle the next set of enemies located by the fog gate. Once these foes are defeated, the resurrection gate becomes available, allowing the tank to intentionally fall in battle. This tactic resets enemy aggro and enables your group to bypass part of the encounter more effectively.
With the area secured, you are ready to confront the first mini-boss.
The mini-boss you will face is the Orc Shadow Elder. This foe resembles the mini-boss from Butcher’s Canyon but introduces new mechanics for the fight:
In Phase 1, the tether mechanic comes into play:
-
The Elder designates a player with a red aura, linking them to the nearest player through a purple beam.
-
A red circle surrounds the marked player, showcasing the tether's maximum range. If the tether is broken, both players will experience a brief stun.
The Elder also brings forth explosive sheep:
-
It summons a curse caster, which produces an explosive sheep. If not addressed rapidly, this sheep will unleash a catastrophic meteor AOE, endangering the entire party.
-
To effectively deal with the sheep, utilize the tether beam to draw it towards the players that are tethered together, allowing you to inflict damage on the threat.
Phase 2 Mechanics
- When the elder reaches 30% health, a shadowmancer will join the fray. Quickly take down the shadowmancer with your tether partner to prevent any issues.
After defeating the elder, you can proceed to the next area.
Section 2: Journey to the Next Mini-Boss
- In this segment, your team will need to navigate through a swarm of mobs to reach the upcoming mini-boss. The tank should maintain aggro while the rest of the group clears the path.
Mini-Boss: Orc Shadowmancer Trio
- This trio of orc shadowmancers is protected by blue tethers, rendering them invulnerable until those tethers are severed. First, deal with the nearby curse caster to ensure a safer engagement.
Breaking the Tethers:
- Use coordinated crowd control (CC) abilities to simultaneously break the tethers. Once the tethers are down, the shadowmancers will become vulnerable and can be defeated.
With the orc trio vanquished, you can now head towards the final boss encounter.
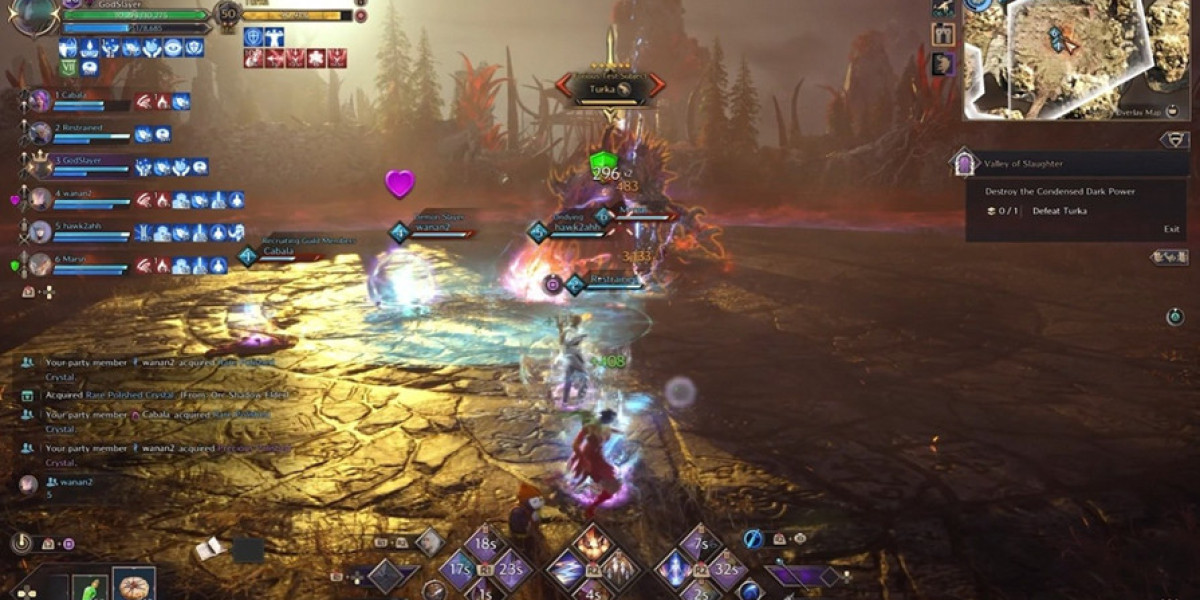
Final Boss: Turka
- The fight against Turka is mechanic-heavy, so it's essential to assign roles and positions in advance to facilitate a smoother battle.
Phase 1 Mechanics: Cone Flame Slam
- Turka begins the encounter with a cone-shaped flame attack aimed at the tank. Position yourself away from the tank to avoid taking damage.
AOE Damage:
- Turka inflicts unavoidable area-of-effect (AOE) damage, approximately 9000 HP per player. Players should group together for healing.
Sheep Phase 1:
-
Turka will mark two players with tethers, similar to the previous elder fight. Six sheep will be spawned; pull them towards the tethered players to maximize damage using the beam.
-
After defeating the sheep, an interactive object will appear. Be careful to avoid meteors before interacting with the object to gain immunity from Turka's AOE wipe.
Phase 2 Mechanics: Explosive Sheep
- Turka will summon one explosive black sheep. Quickly eliminate it using the tether beam to avert a team wipe.
Sheep Phase 2:
- At 30% health, Turka will spawn eight sheep instead of six. Use the same strategy as before to take them out.
Dash Attack:
Dungeon Strategy and Rewards
-
To successfully evade Turka's extended dash assault, utilize a movement dodge by pressing the directional key combined with the block button.
-
Strategically lure Turka to charge through the sheep, inflicting damage upon them in the process.
-
Maintain this tactic, consistently applying damage per second (DPS) until Turka is ultimately vanquished.
In Tier 2 dungeons, players can expect enhanced rewards that significantly impact their gameplay experience.
Rewards Overview:
- Dimension Tokens : Access to chests within Tier 2 requires collecting 450 dimension tokens, a noticeable increase from the 300 tokens needed in Tier 1.
- Upgraded Gear : Players will find materials, weapons, and armor that provide a substantial upgrade, facilitating smoother advancement through the game.
Difficulty Challenges and Affixes:
Engaging in challenge mode introduces intricate mechanics that vary by difficulty tiers (5, 9, and 13):
- Increased Sheep : The sheep phase sees a higher number of sheep present, ramping up the challenge.
- Dual Tethers : Two players will experience simultaneous tethering, adding complexity to coordination.
- Black Sheep Mechanic : Alongside standard mechanics, explosive sheep are summoned, creating additional hazards.
Each week, two dungeons are highlighted in challenge mode, featuring unique affixes that alter the rules of engagement. Expect modifications such as stunning totems and various environmental shifts that enhance the challenge.
For those looking for visual guidance, check out the video guide available.
Throne and Liberty Lucent: What are They and How to Get
Throne and Liberty Lucent is the premium in-game currency used in TL Lucent for purchasing a wide range of items such as exclusive skins and powerful equipment, which significantly enhances the gaming experience. Players can acquire Lucent by completing quests, participating in events, and engaging in daily activities for steady rewards. For those seeking quick access, platforms like LootBar provide a secure way to purchase Lucent, usually making it available almost immediately, with a possible short holding period for Auction House transactions.
Why Buy Throne and Liberty Lucent on LootBar?
If players want to top up Throne and Liberty Lucent, they may want to consider the lootbar game trading platform. One of the main attractions of using lootbar.gg is its competitive pricing, which offers some of the lowest prices available for TL Lucent on the market. This feature is particularly advantageous for budget-conscious gamers seeking to maximize their investment without compromising on quality or security.
Additionally, lootbar.gg prioritizes safe transactions, providing a reliable and secure platform for purchasing in-game items. This ensures that players can buy TL Lucent with peace of mind, knowing that their account information is protected. Furthermore, the user-friendly interface of lootbar.gg makes it easy for players to navigate and quickly find the Lucent they need, enhancing their overall gameplay experience.
A Step-by-Step Guide to Buy Throne and Liberty Lucent on LootBar
To top up Throne and Liberty Lucent on the Lootbar trading platform, start by visiting the website and selecting the amount of Lucent you wish to purchase. Click on "Purchase Now" to initiate your order. Once you've decided on your Lucent amount, ensure you are over level 40 in the game and have unlocked the Auction House feature. You will need to post an item for sale in the Auction House. This could be armor, weapons, crafting materials, or accessories, and you should set your desired total price for the item.
Next, you will need to provide the necessary information to complete the transaction. This includes details about your region, server, item name, unit, and total price. After entering these details, upload a screenshot of the item you listed for sale, ensuring that its characteristics and stats are clearly visible. Once all these steps are completed, you can expect to receive your Lucent transfer within 15 minutes to 2 hours. Remember, commission fees for trades in the Auction House are not covered by Lootbar, so plan accordingly. This process makes it easy to engage in Throne and Liberty buy transactions and quickly enhance your in-game experience.


